Step 1: Log in and Access Facebook Business Manager
- Log into Facebook: Sign in to your personal Facebook account (the one you use for Facebook). If you don’t have a Facebook account yet, create one first – it’s required for Business Manager – business.facebook.com
- Go to Business Manager: In a web browser, navigate to business.facebook.com. This is the homepage for Facebook Business Manager (also called Meta Business Manager). Here, you’ll manage all your Facebook assets like Pages and ad accounts from one dashboard.
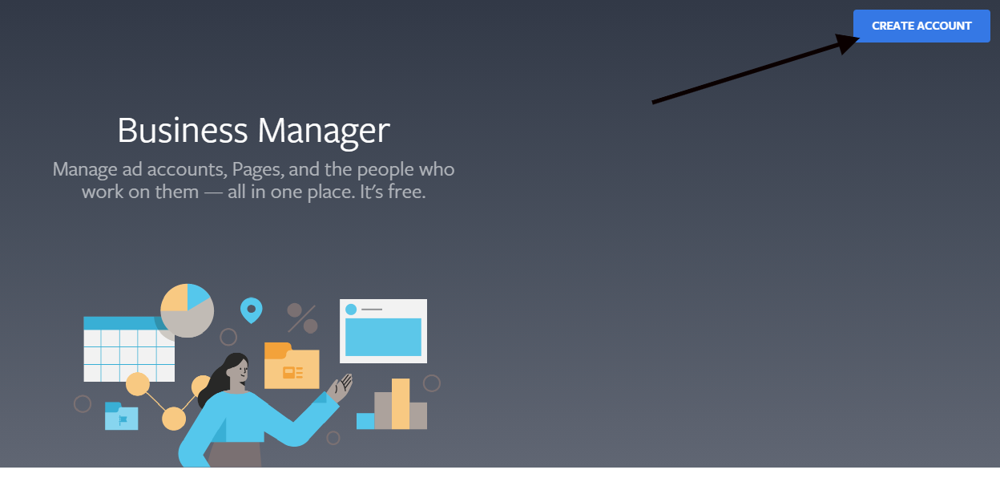
Facebook Business Manager homepage. Click the blue “Create Account” button in the top right corner to start setting up a new Business Manager account.
- Click “Create Account”: On the Business Manager homepage, find the Create Account button (usually at the top right). Click this button to begin the setup. A pop-up form will appear to collect your business details.
Step 2: Create Your Business Manager Account
Enter Business Details: In the pop-up form titled “Create Your Business Manager Account,” fill in the required info:
- Business Name: For example, use your church or ministry name. This name will be visible across Facebook, so choose a clear name (e.g., First Church of Smithville).
- Your Name: Enter your first and last name.
- Business Email: Provide an email you have access to (you’ll need to verify it). This should be an email you don’t mind using for church or business communications
Submit the Form: After filling in your details, click the Submit button. Facebook will create your Business Manager account.
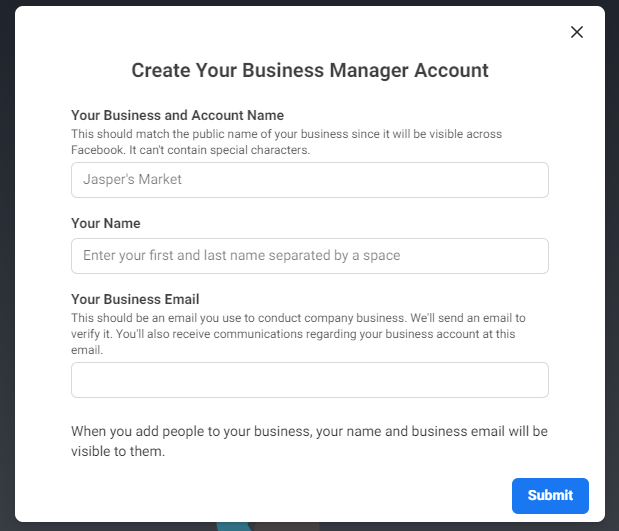
Fill in your Business Name, Your Name, and Business Email in the “Create Your Business Manager Account” form, then click Submit.
- Verify Your Email: Facebook will send a confirmation email to the address you provided. Check your inbox for an email from Facebook Business (it might come from [email protected]). Click the Confirm Now link in that email to verify your address. Once confirmed, your Business Manager setup is complete. (You may need to refresh or log in again to see your Business Manager dashboard after verification.)
Note: Your personal Facebook profile is just used to log in – people you add to your Business Manager cannot see your personal Facebook posts or info
Step 3: Open Business Settings in Business Manager
Now that your Business Manager (Meta Business Suite) account is ready, you’ll create a new ad account within it. All ad account creation and management is done in the Business Settings section of Business Manager.
- Go to Business Settings: From the Business Manager dashboard, find and click on Business Settings. The location of this can vary:
- If you see a navigation menu or a gear icon (⚙️), click that (often labelled “Business Settings” or found under a “More Tools” menu).
- In newer interfaces (Meta Business Suite), there might be a menu on the left side; scroll down and click the Settings gear icon at the bottom left. This opens the Business Settings panel.
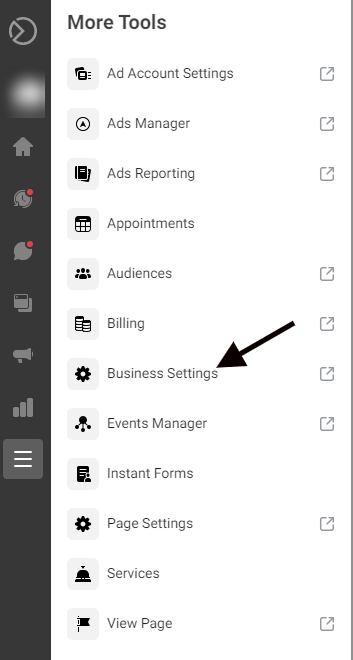
In your Business Manager dashboard, click Business Settings (gear icon). In some Facebook interfaces you might need to click More Tools to find it, as shown here.
- Business Settings Panel: After clicking, you will see the Business Settings page. On the left sidebar, it lists various sections (Users, Accounts, etc.). This is where you manage assets like Pages, ad accounts, Instagram accounts, and more.
Step 4: Navigate to “Ad Accounts” and Add a New Account
Select Ad Accounts: In the Business Settings sidebar, click on Accounts to expand that section if it’s not already expanded. Under Accounts, select Ad Accounts. This will show the Ad Accounts section on the right side. (If you just created Business Manager, you might not see any ad accounts listed yet.)
Click the Add Button: In the Ad Accounts section, look for a blue Add button (usually on the top right or top center of the Ad Accounts panel). Click the Add button to see options for adding an ad account.
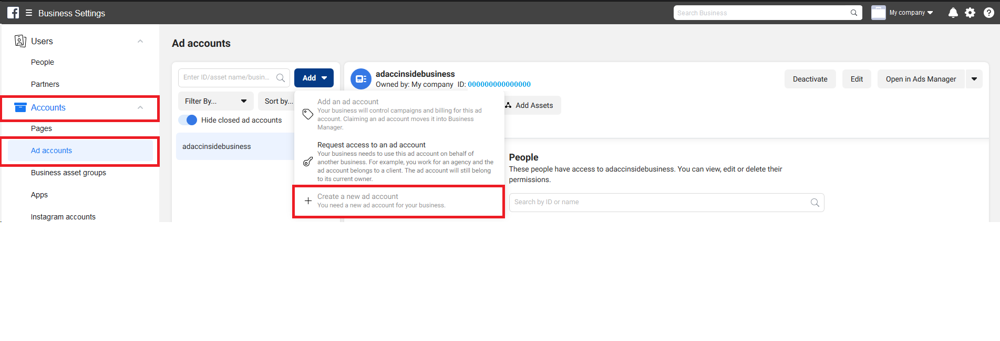
Business Manager Ad Accounts settings. Click the Add button and choose “Create a New Ad Account” from the drop-down menu.
- Choose “Create a New Ad Account”: A drop-down menu will appear with three options: Add an Ad Account (to add an existing account), Request Access to an Ad Account (to get permission to use someone else’s), and Create a New Ad Account. Select Create a New Ad Account
This tells Facebook you want to set up a brand new ad account for your business/church.
Step 5: Enter Your Ad Account Details (Name, Time Zone, Currency)
After choosing to create a new account, a form will pop up to gather details for your new ad account.
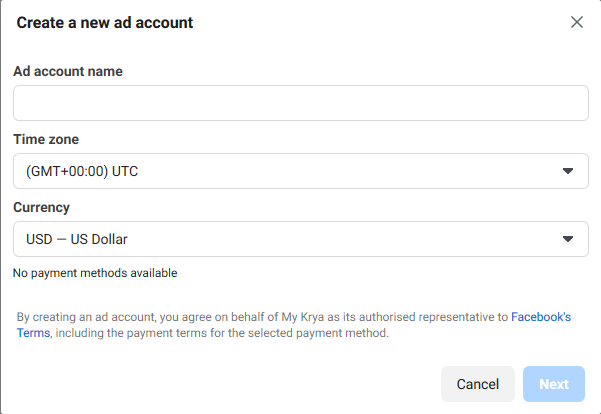
The “Create a new ad account” form. Here you’ll enter an Ad Account Name, and confirm the Time Zone and Currency for your ads.
- Ad Account Name: Type a name for your ad account. Make it something descriptive for your church or project – for example, “Smithville Church Ads Account”. This name is just for your reference (to identify the ad account in your Business Manager).
- Time Zone: Choose the time zone you want the ad account to use. This usually defaults to your current Facebook profile’s time zone. Make sure it’s correct, because it will affect scheduling and reporting of your ads. For instance, if you are in Eastern Time (US), ensure it says (GMT-05:00) Eastern Time.
- Currency: Select the currency you will pay for ads in (e.g., US Dollar – USD). Typically this should be your local currency or the currency of your church’s bank account. Note: Once an ad account is created, the currency and time zone are difficult to change, so double-check these.
- Click “Next”: After filling in the name, verifying time zone and currency, click the Next button to proceed.
Step 6: Specify Who the Ad Account Is For (“My business”)
Facebook will ask “Who will this ad account be used for?” This step is to confirm the ownership of the ad account, especially if you manage client accounts.
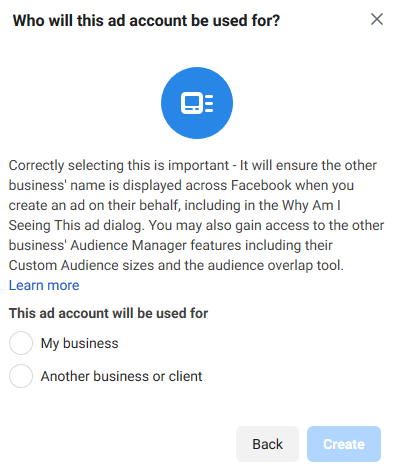
When asked “Who will this ad account be used for?”, select “My business” (your church or organization) and click Create to finalize the new ad account creation.
- Choose “My business”: Since you are creating this ad account for your own organization (your church), select the option My business. (The other option, “Another business or client,” is if you were an agency creating an account to use on behalf of someone else.)
- Create the Ad Account: After selecting “My business,” click the Create button. Facebook will now create the new ad account under your Business Manager. This usually takes just a moment.
Important: Each new Business Manager can initially create only one ad account at first
Don’t worry – as you begin spending on ads and build trust with Facebook, they typically allow more ad accounts if needed. But for most small organizations or churches, one ad account is enough.
Step 7: Assign People and Set Permissions for the Ad Account
Once the ad account is created, Facebook will prompt you to add people to it and set their permissions. Since you created the account, you’ll at least see yourself on this list.
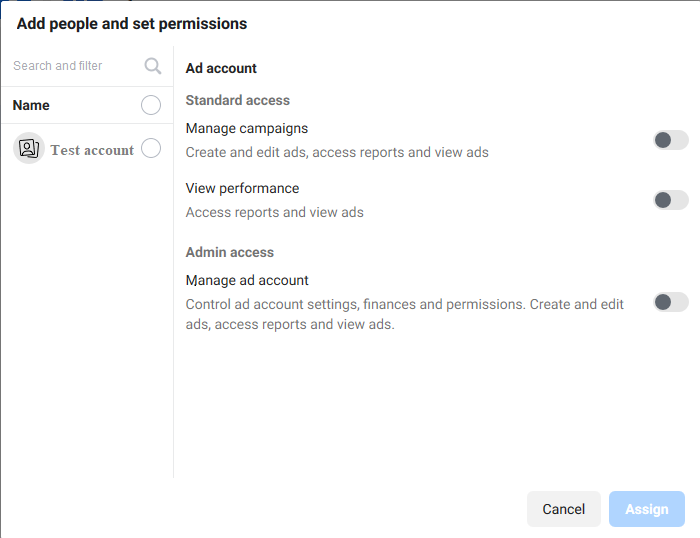
Adding people to your new ad account. Make sure your name is selected and give yourself full control by toggling Manage ad account to on (as shown). Then click Assign.
- Add Yourself: In the “Add people and set permissions” window, you should see your own Facebook profile listed (because you’re the admin of the Business Manager). If your name isn’t already checked, click your name to select yourself. (If you have other team members who will help manage ads, you can select them too, but you can also add people later. For now, we’ll focus on you.)
- Set Permissions: There will be toggle switches or checkboxes for permissions. For full control of your new ad account, enable Manage Ad Account (under Admin Access). This gives you permission to create and edit ads, manage billing, and view reports. You might also see options for “Create ads” or “View performance” – those are standard access levels. If you’ve selected yourself and turned on Manage Ad Account, that covers everything (the lower-level permissions will usually auto-check when you give admin access).
- Assign: Click the Assign or Save Changes button to confirm these people and permissions. This ensures you (and any others you added) are now linked to the ad account with the proper access rights. You’ve now successfully created the ad account and assigned yourself as its administrator.
Now your new ad account is ready to use! You can access it anytime via Facebook Ads Manager to create ad campaigns. Next, you should add a payment method so that you can pay for any ads you run.
Step 8: Add a Payment Method to Your Ad Account
Before you can run ads, you’ll need to set up a billing method (like a credit/debit card or other payment option) for the ad account. You can do this immediately after creation or later, but it’s best to set it up now.
- Go to Payment Settings: In Business Manager, navigate to the Ad Account Settings or Payment Settings for your new ad account. (If you just finished creating the account and assigned people, Facebook might prompt you to add a payment method. If not, you can find Payment Settings by clicking the menu (☰) and looking for Billing or Payment Settings under your ad account tools.)
- Click “Add Payment Method”: In the Payment Settings section, click the Add Payment Method button. A window will pop up where you can enter your billing information.
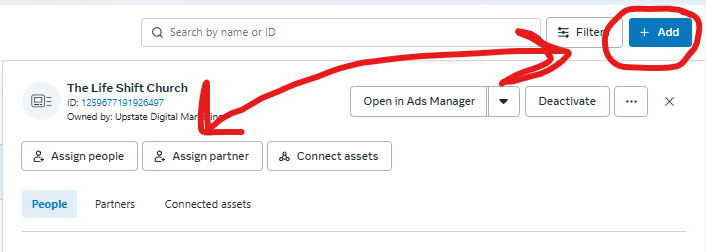
After you are done please add us as a partner to your ad account. Here is our Business Manager I.D. – 1202355176539930
